
How to Install Front Disc Brake Conversion Kit: Complete Step-by-Step Guide
Introduction
Is your classic car still equipped with outdated drum brakes that leave you longing for stronger, more reliable stopping power? Are you tired of worrying about brake fade during spirited drives or steep descents? Upgrading to a front disc brake conversion kit represents one of the most impactful modifications you can make to improve both safety and driving enjoyment. This comprehensive guide walks you through every step of the installation process, from initial preparation through final testing, ensuring you achieve professional-quality results in your own garage.
Many vehicle owners hesitate at the prospect of installing a disc brake conversion kit, assuming the project requires specialized knowledge or professional equipment. However, with careful preparation, the right tools, and this detailed guide, determined DIY mechanics can successfully complete this upgrade and experience the remarkable difference that modern disc brakes provide. The investment in time typically ranges from six to ten hours, depending on your experience level and whether you’re tackling both front wheels simultaneously.
Beyond the obvious safety benefits, a properly installed disc brake conversion adds value to your vehicle while providing consistent, fade-resistant stopping power regardless of driving conditions. Whether you’re driving a vintage muscle car, a restored pickup truck, or a classic European import, upgrading from drum to disc brakes transforms your driving experience fundamentally. Let’s begin your journey toward superior stopping power.
Understanding Front Disc Brake Conversion Kits
Before diving into the installation process, understanding what you’re working with ensures you select the right components and approach for your specific vehicle application.
What Is a Front Disc Brake Conversion Kit?
A front disc brake conversion kit is a comprehensive package designed to replace your vehicle’s factory drum brake system with modern disc brake technology. Unlike simple replacement parts, these kits include all necessary components engineered to work together as a complete system. The kit transforms your existing spindle or suspension setup to accept disc brake components while maintaining proper compatibility with your vehicle’s master cylinder, brake lines, and overall braking architecture.
Quality conversion kits are vehicle-specific, meaning they’re designed for particular makes, models, and years. This specificity ensures proper fitment, correct bolt patterns, and appropriate sizing for your application. A kit designed for a 1964-1966 Ford Mustang, for example, differs significantly from one intended for a 1967-1969 Camaro, even though both vehicles might appear similar at first glance.
The transformation from drum to disc brakes affects not just the visible components but the entire braking philosophy. Disc brakes offer superior heat dissipation, consistent pedal feel, and resistance to fade—all qualities that matter whether you’re commuting daily or pushing performance limits on a track.
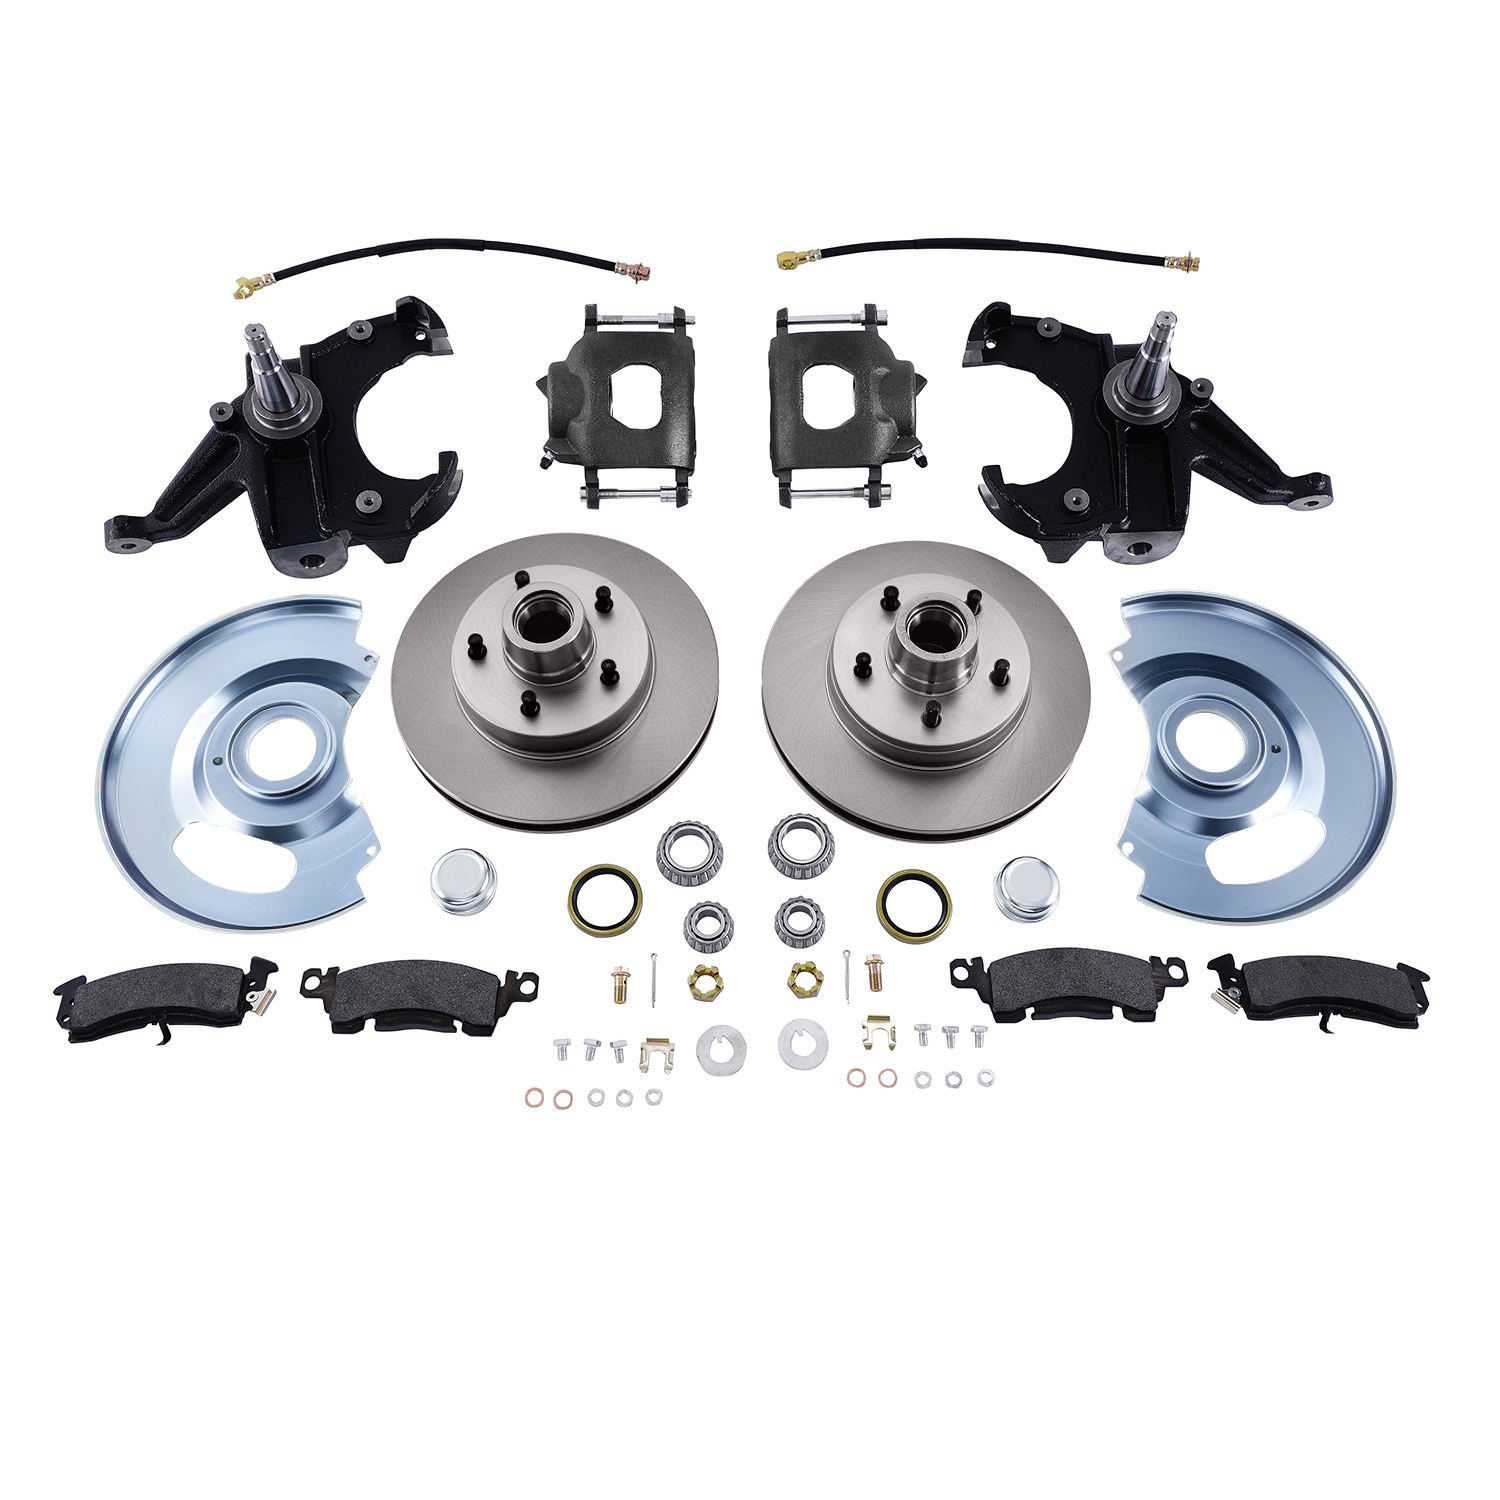
Components Included in a Conversion Kit
Understanding each component helps you verify your kit’s completeness and prepares you for assembly:
Brake Rotors: The heart of your new braking system, rotors provide the friction surface where brake pads grip to slow your vehicle. Quality kits include either standard rotors, drilled rotors for improved cooling, slotted rotors for gas and moisture evacuation, or combinations thereof. Rotors typically range from 11 to 13 inches in diameter depending on your vehicle application and intended use.
Brake Calipers: These clamping devices house the piston(s) that push brake pads against the rotor. Conversion kits include either single-piston or dual-piston calipers, with aluminum or cast iron construction. The caliper mounts to a bracket that attaches to your spindle or control arm, positioning it correctly relative to the rotor.
Brake Pads: The friction material that contacts the rotor, brake pads come in various compounds ranging from street-friendly semi-metallic to high-performance ceramic or organic formulations. Most kits include appropriate pads for your intended use, though many enthusiasts upgrade to performance pads after initial installation.
Mounting Brackets: These critical components adapt your existing spindle to accept disc brake calipers. Brackets must position the caliper correctly—too close and pads won’t clear the rotor, too far and brake effectiveness suffers dramatically. Quality brackets are machined from steel or aluminum and include provisions for brake line mounting.
Parking Brake Mechanism: Many kits include a parking brake cable bracket or mechanical linkage to maintain functional emergency braking. This component adapts your existing parking brake system to work with the new disc brake setup, though some applications may require additional components or modifications.
Hardware and Fittings: Quality kits include all mounting bolts, washers, and brake line fittings needed for installation. This includes banjo bolts with copper washers for connecting brake lines, mounting hardware for calipers and brackets, and any clips or retainers necessary for proper assembly.
Optional Components: Some comprehensive kits also include power brake boosters, master cylinders, proportioning valves, and stainless steel braided brake lines. These complete system packages simplify the upgrade process by ensuring all components are matched for optimal performance.
Types of Conversion Kits Available
Understanding the different kit categories helps you select the right option for your needs and budget:
Budget-Friendly Basic Kits provide essential components for the conversion—rotors, calipers, brackets, and pads. These kits require you to use existing brake lines, master cylinder, and potentially your power booster if equipped. While cost-effective, they demand careful attention to component compatibility and may require additional purchases.
Mid-Range Performance Kits add higher-quality components like upgraded calipers, performance brake pads, and often include stainless steel brake lines. These kits balance cost against performance improvements and typically represent the best value for enthusiast builds.
Premium Complete System Kits include everything needed for the conversion, including master cylinders, power boosters, proportioning valves, and often hydraulic fittings. These turnkey solutions minimize compatibility concerns and ensure all components work together as an engineered system.
Pre-Installation Preparation and Planning
Successful brake conversions begin long before you turn the first wrench. Thorough preparation prevents frustration and ensures smooth installation.
Gathering Required Tools
Equipping yourself with the right tools before starting prevents mid-project trips to the auto parts store:
Essential Hand Tools: A complete socket set in both metric and SAE sizes handles most fastener removal and installation. You’ll need wrenches in various lengths, with combination (open-end/box-end) wrenches particularly useful. A breaker bar provides leverage for stubborn bolts, while a torque wrench is absolutely critical for proper installation—brake components require specific torque specifications for safety.
Specialty Brake Tools: A brake caliper compression tool forces pistons back into their bore, necessary before installing new pads. Brake bleeder kits (either manual or pressure-based) purge air from the system after installation. A flare nut wrench set prevents rounding brake line fittings during removal and installation.
Support and Safety Equipment: Jack stands rated for your vehicle’s weight provide secure support—never work under a vehicle supported only by jacks. Wheel chocks prevent rolling, and a hydraulic floor jack facilitates wheel removal. Safety glasses protect your eyes from debris and brake dust.
Measurement and Inspection Tools: A dial indicator or simple measuring tools help verify component positioning and alignment. Thread locker compounds secure critical fasteners, while brake cleaner and shop rags maintain a clean work area.
Preparing Your Workspace
Your workspace setup significantly impacts installation efficiency and quality:
Space Requirements: Ensure adequate room to work around the vehicle with clear access to both front wheel areas. Remove clutter that might interfere with component handling or create tripping hazards. Adequate lighting—preferably adjustable shop lights—lets you see details clearly.
Surface Conditions: A level concrete floor provides stable support for jack stands. If working on an uneven surface, use leveling blocks or shims beneath stands. Keep the workspace clean; brake dust contains hazardous materials and should be minimized and properly cleaned up.
Documentation Organization: Before starting, organize your kit components by grouping related parts together. Keep instruction sheets accessible and consider taking photos during the disassembly process for reference during reassembly. A magnetic tray prevents lost fasteners, especially important when working on vehicles where small clips and washers are easy to misplace.
Vehicle Preparation Steps
Proper vehicle preparation prevents complications during installation:
Secure the Vehicle: Park on a level surface, engage the parking brake, and chock the rear wheels. Loosen wheel lug nuts while the vehicle is still on the ground before lifting—this prevents spinning the studs when breaking lugs loose.
Lift and Support Safely: Use a hydraulic jack to lift the front of the vehicle, then position jack stands at the manufacturer’s specified points. The vehicle frame rails or designated jack points typically provide the most secure support. Never position stands beneath control arms, springs, or suspension components that might shift.
Preliminary Inspections: Before removing any components, inspect your existing brake system, suspension, and wheel bearings. Note any existing issues that should be addressed during the conversion. Replace worn wheel bearings, inspect tie rods and ball joints, and verify your spindle condition—all components that should be addressed if problematic.
Step-by-Step Installation Process
With preparation complete, the actual installation can proceed methodically. Follow each phase carefully for a professional result.
Step 1: Remove the Existing Drum Brake Assembly
Begin by completely removing the drum brake components:
Remove the Drum: Most drums slide off after releasing the adjuster, accessible through a small hole in the backing plate. Some drums require pulling against spring tension—strike the drum with a rubber mallet while pulling to break it free. Never use excessive force; a stuck drum usually indicates accumulated brake dust or minor rust.
Inspect the Wheel Cylinder: With the drum removed, examine the wheel cylinder for leaks, corrosion, or damage. While you’re upgrading to disc brakes, a leaking wheel cylinder indicates the brake system has been neglected—consider replacing wheel cylinders on the opposite side as well if significant age or wear is evident.
Disconnect Brake Lines: Using appropriate flare nut wrenches, disconnect the brake line from the wheel cylinder. Cap or plug open lines immediately to prevent contamination and minimize fluid loss. Place a drip pan beneath to catch any remaining brake fluid.
Remove the Drum Brake Backing Plate: The backing plate mounts to the spindle and must be completely removed. Note the routing of any parking brake cables or other connections before disconnecting them. Remove all mounting bolts and carefully withdraw the assembly from the spindle.
Inspect the Spindle: With the backing plate removed, inspect the spindle for damage, excessive wear, or cracks. Clean the spindle surface where the new bracket will mount, removing all rust, old paint, and debris. The mounting surface must be clean and flat for proper bracket alignment.
Step 2: Install the Disc Brake Mounting Bracket
The mounting bracket positions your new caliper correctly relative to the rotor:
Trial Fit the Bracket: Before securing permanently, hold the bracket against the spindle to verify fitment. Some brackets use existing backing plate mounting points; others require drilling or tapping new holes. Your kit instructions specify any modifications needed.
Clean and Prepare Mounting Surfaces: Remove all rust and contamination from the mounting surfaces using a wire brush, sandpaper, or grinder. Apply a thin coat of rust-preventive primer to bare metal, allowing it to dry completely before proceeding.
Install the Bracket: Position the bracket exactly as specified in your instructions—bracket orientation is critical. Install all mounting bolts, starting them by hand to prevent cross-threading. Use thread locker on bolts that will bear load, not just hold the bracket in position.
Torque to Specification: Using your calibrated torque wrench, tighten mounting bolts to the specification in your instructions—typically between 70 and 90 foot-pounds for spindle bracket bolts. Uneven tightening causes bracket distortion and misalignment.
Step 3: Install the Brake Rotor
The rotor mounts directly to the hub or wheel bearing assembly:
Clean the Rotor Surface: Remove any protective coating or anti-rust compound from the new rotor using brake cleaner and a clean cloth. Inspect the rotor for shipping damage, warping, or defects before installation.
Mount the Rotor: Position the rotor on the hub assembly, ensuring it seats flat against the mounting surface. Some applications use lug nuts temporarily to hold the rotor in position; others may require a center pilot to maintain alignment. Verify the rotor spins freely without interference.
Check Rotor Runout: Before proceeding, verify the rotor doesn’t exhibit excessive runout (wobble) by using a dial indicator at the rotor’s outer edge. Runout exceeding 0.003 inches can cause brake pulsation. Minor runout from shipping can often be corrected by removing and reinstalling the rotor rotated 180 degrees.
Step 4: Install the Brake Caliper
The caliper assembly contains the pistons and brake pads:
Install New Brake Pads: Before mounting the caliper, install the brake pads into the caliper. Some calipers use clips and hardware to retain pads; others feature integral pad guides. Apply brake grease to pad contact points as specified by your kit instructions—avoid getting lubricant on friction surfaces.
Mount the Caliper: Carefully position the caliper over the rotor, ensuring pads align with the rotor surface and the caliper mounting holes align with the bracket. Install mounting bolts (often called caliper pins or bolts) and thread them by hand first.
Torque the Caliper Mounting: Using your torque wrench, tighten caliper mounting bolts to specification—typically 25 to 40 foot-pounds depending on application. Uneven tightening affects caliper alignment and brake pad contact.
Connect the Brake Line: Route the brake line to the caliper inlet and secure with the provided fitting. Use new copper washers or sealing washers as specified by your kit. Hand-tighten initially, then final torque using a flare nut wrench to prevent fitting damage.
Step 5: Install Parking Brake Components
If your kit includes parking brake hardware:
Mount the Parking Brake Bracket: Position the parking brake cable bracket according to your instructions. This component adapts your existing parking brake mechanism to work with the new disc brake setup.
Adjust Cable Routing: Route parking brake cables to maintain proper leverage and avoid binding. Many conversions require adjusting cable length or replacing cables with longer versions to accommodate the new geometry.
Verify Parking Brake Operation: Before proceeding, manually verify the parking brake mechanism moves freely through its full range of motion without binding or excessive resistance.
Step 6: Install Remaining Brake System Components
Additional components complete your conversion:
Power Brake Booster (if included): If your kit includes a new power brake booster, mount it between the brake pedal and master cylinder. Connect vacuum lines, pushrod, and any electrical connections as specified.
Master Cylinder (if included): Mount the new master cylinder to the booster or firewall mount. Bleed the master cylinder before installation to ensure no air is trapped in the bore—some builders prefer bench bleeding; others bleed after installation.
Stainless Steel Brake Lines (if included): Route new brake lines from the master cylinder to each wheel, following paths that avoid heat sources, moving parts, and sharp edges. Maintain adequate clearance to prevent chafing or damage during suspension travel.
Proportioning Valve: If your kit includes a proportioning valve, mount it in-line with the front brake circuit. Some valves are adjustable, allowing fine-tuning of front-to-rear brake balance.
Step 7: Bleed the Brake System
Air trapped in brake lines prevents proper brake operation:
Prepare for Bleeding: Fill the master cylinder reservoir with fresh DOT 3 or DOT 4 brake fluid—never use fluid older than one year. Check that all connections are tight and the reservoir is properly filled.
Bleed Each Wheel: Starting with the wheel farthest from the master cylinder, attach a clear bleed hose to the caliper bleeder valve. Submerge the other end in a container partially filled with brake fluid. Have a helper pump the brake pedal slowly while you crack the bleeder valve open.
Follow Proper Bleeding Sequence: Typically bleed wheels in order: right rear, left rear, right front, left front. This sequence ensures any air trapped in the system works toward the furthest point and exits.
Check for Air: Watch the hose for air bubbles emerging. Continue bleeding each wheel until no bubbles appear and the pedal feels firm. A spongy pedal indicates air remains in the system.
Refill and Inspect: Top off the master cylinder as needed. Check all fittings for leaks after bleeding is complete. Wipe away any spilled brake fluid—it’s corrosive to paint and can damage vehicle finishes.
Step 8: Final Assembly and Testing
Complete the installation with final touches:
Reinstall Wheels: Mount wheels and hand-tighten lug nuts. Lower the vehicle to the ground and torque lug nuts in a star pattern to specification—typically 80 to 100 foot-pounds for most applications.
Test Brake Function: Before driving, test brake pedal feel with the engine off. The pedal should be firm with minimal travel. Start the engine and verify the power booster functions—pedal should become significantly firmer with engine running.
Perform Low-Speed Testing: In a safe, clear area, test brakes at low speeds first. Apply firm braking from 15-20 mph, then check for proper function, unusual noises, or pulling. Allow the brakes to cool between test applications.
Break-in Procedure: Follow the manufacturer’s break-in procedure for your specific brake pads—this typically involves moderate braking from speed with cooling periods between applications. Break-in ensures optimal pad-to-rotor contact and prevents glazing.
Common Mistakes to Avoid
Learning from others’ errors helps ensure your installation succeeds:
Insufficient Torque: Failing to properly torque critical fasteners leads to component failure, dangerous conditions, and costly repairs. Every fastener has a purpose; all require proper torque specification. Invest in a quality torque wrench and use it.
Incorrect Pad Installation: Installing brake pads backwards or upside down prevents proper function and can damage components. Note pad orientation carefully during installation—many pads have directional grooves or markings indicating correct positioning.
Contaminating Friction Surfaces: Getting oil, grease, or even skin oils on brake pads or rotors destroys their friction capability. Clean components with brake cleaner only, and handle pads while wearing gloves or by the edges only.
Skipping the Bleeding Process: Incomplete brake bleeding leaves air in the system, creating a spongy pedal with reduced stopping power. Take time to bleed thoroughly—it’s tedious but essential.
Ignoring Wheel Bearing Adjustment: If your conversion affects wheel bearing preload, failing to properly adjust bearings leads to premature failure, wheel wobble, or dangerous conditions. Verify bearing adjustment after installation.
Using Wrong Brake Fluid: Mixing incompatible brake fluids damages seals and reduces braking performance. Use only the specified fluid type and never reuse old fluid.
Maintenance and Care After Installation
Proper maintenance ensures your new brakes provide years of reliable service:
Initial Inspection: After the first 500 miles, inspect all mounting points for tightness, check brake fluid level, and verify proper pad contact by examining pad wear patterns through the caliper inspection window.
Regular Checks: Include brake inspection in your regular maintenance routine. Check pad thickness, rotor condition, and inspect all lines and connections annually. Brake pads on typical street applications last 30,000 to 50,000 miles, but driving style and conditions significantly affect wear rates.
Cleaning and Care: Occasionally cleaning brake components with appropriate brake cleaner removes dust and debris that accelerates wear. Never use compressed air to blow dust—brake dust contains hazardous materials and should be vacuumed or wet-mopped.
Fluid Replacement: Change brake fluid every two to three years regardless of mileage. Brake fluid absorbs moisture over time, reducing boiling point and corroding internal components. Fresh fluid maintains braking performance and extends system life.
Frequently Asked Questions
How long does it take to install a front disc brake conversion kit?
For an experienced mechanic with all tools available, expect six to eight hours for both wheels. First-time installers should allow eight to twelve hours, accounting for unfamiliarity and potential complications. Rushing leads to mistakes—take your time and verify each step.
Do I need to upgrade my master cylinder with the conversion?
Not always, but it’s often recommended. If your existing master cylinder is in good condition and sized appropriately for your new brakes, it may work fine. However, a properly matched master cylinder ensures optimal pedal feel and braking balance. Many complete kits include a matched master cylinder for this reason.
Can I install a disc brake conversion on drum brake spindles?
Yes, in most cases. Many kits are specifically designed for vehicles originally equipped with drum brakes, using adapter brackets to mount disc brake components to drum brake spindles. The key is selecting a kit designed for your specific spindle type—GM A-body, Ford Mustangs, and others have dedicated kit options.
Will my parking brake still work after the conversion?
With proper installation of all parking brake components, your emergency brake should function normally. Some applications require new cables, adjusting mechanisms, or additional hardware. If parking brake function is critical for your vehicle, ensure your kit includes all necessary components and follow installation instructions carefully.
Why do my new brakes squeak?
Brake squeak is common with new pads and typically diminishes with use. Ensure pads are properly seated, use anti-squeal shims if provided, and avoid high-temperature bedding procedures if not specified by the manufacturer. Persistent squeaking may indicate improper installation or incompatible pad compounds.
How much does a quality front disc brake conversion kit cost?
Prices range significantly based on quality and completeness. Basic kits start around $300-$500, mid-range performance kits cost $500-$900, and complete turnkey systems with boosters and master cylinders run $1,000-$2,000 or more. Budget kits may save money initially but often require additional purchases or provide lesser performance.
Conclusion
Installing a front disc brake conversion kit represents a significant upgrade that transforms your vehicle’s safety, performance, and driving enjoyment. The process requires careful attention to detail, proper tools, and methodical execution, but the results justify the effort. Your vehicle now stops with consistent, fade-resistant braking power that drum brakes simply cannot match.
Remember that brakes are your vehicle’s most critical safety system. If at any point you feel uncertain about proceeding, consult a professional mechanic. The investment in professional installation ensures proper function and provides peace of mind. However, for capable DIY mechanics, this project offers tremendous satisfaction along with substantial safety improvements.
Your newly converted vehicle is ready for the road. Take time to familiarize yourself with the improved braking feel, and enjoy the confidence that comes with superior stopping power. Safe driving begins with brakes you can trust.
Where to Buy a Where to Buy a Front Disc Brake Conversion Kit?
If you’re looking for a reliable supplier, it’s important to choose a manufacturer that offers:
- Stable product quality
- Consistent supply
- Wholesale support
- OEM branding options
For bulk orders or reseller inquiries, you can check this product page:
If you’re looking for a reliable supplier, it’s important to choose a manufacturer that offers:
- Stable product quality
- Consistent supply
- Wholesale support
- OEM branding options
For bulk orders or reseller inquiries, you can check this product page: